Setup Guide: Ghost CMS on Proxmox LXC (Ubuntu 24.04 Bare Metal)
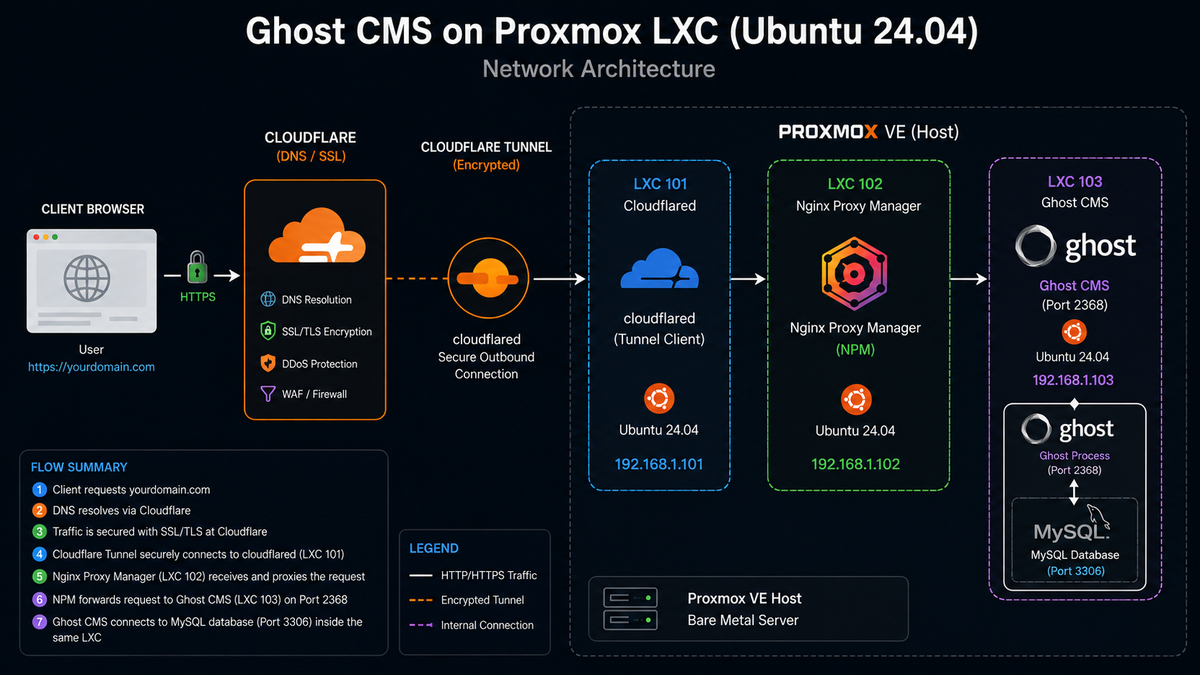
This guide documents how to provision and configure Ghost CMS inside a bare-metal Proxmox LXC running Ubuntu 24.04. It ensures correct Node.js/NPM version alignment and outlines routing traffic through your existing networking architecture.
Network Routing Architecture
Client Browser ──> Cloudflare (DNS/SSL) ──> Cloudflare Tunnel ──> Nginx Proxy Manager (NPM) ──> Ghost LXC (Port 2368)
Step 1: Create the Proxmox LXC Container
- Log into your Proxmox VE Web UI.
- Click Create CT in the top right.
- Configure the following container settings:
- Template: Select
ubuntu-24.04-standard. - Root Disk: Allocate at least 10 GB storage.
- CPU: Allocate at least 2 vCPUs.
- Memory: Allocate at least 2 GB RAM (Ghost build steps can be resource-intensive).
- Network: Assign a Static IP address (e.g.,
192.168.1.50/24) and your local gateway.
- Template: Select
- Start the container and open the console.
Step 2: System Update & User Preparation
Ghost requires a non-root user with sudo privileges to run installation actions.
Run these commands inside the LXC console as root:
# Update package definitions
apt update && apt upgrade -y

# Install prerequisite tools
apt install -y curl sudo build-essential ufw git

# Create a dedicated system user for Ghost
adduser ghostuser

# Add the new user to the sudo group
usermod -aG sudo ghostuser

# Switch to the new user context
su - ghostuser
Step 3: Install Node.js (Version 22 LTS)
Ghost requires Node.js 22 LTS for production compatibility. Do not install Node.js from the stock Ubuntu repository, as the version may be unsupported.
Run these commands as ghostuser:
# Download and execute the NodeSource setup script for Node 22
curl -fsSL https://deb.nodesource.com/setup_22.x | sudo -E bash -

# Install Node.js and package manager dependencies
sudo apt-get install -y nodejs

# Verify expected operational versions
node -v  # Expected output: v22.x.x
npm -v   # Expected output: v10.x.x
Step 4: Install MySQL 8 Database Server
Ghost handles state tracking using a MySQL 8 backend database.
Run these commands as ghostuser:
# Install the core MySQL package
sudo apt install -y mysql-server

# Secure the installation and initialize root password structures
sudo mysql_secure_installation
Follow the interactive prompt instructions to set a strong root password.
Initialize the Database for Ghost
Log into your MySQL interface to create a production database asset:
sudo mysql -u root -p
Run the following SQL queries within the prompt:
CREATE DATABASE ghost_prod_db;
CREATE USER 'ghost_db_user'@'localhost' IDENTIFIED BY 'YOUR_SECURE_PASSWORD';
GRANT ALL PRIVILEGES ON ghost_prod_db.* TO 'ghost_db_user'@'localhost';
FLUSH PRIVILEGES;
EXIT;
Step 5: Install Ghost-CLI & Deploy Ghost CMS
Install the global management engine tool:
sudo npm install -g ghost-cli@latest
Establish target deployment directory paths:
sudo mkdir -p /var/www/ghost
sudo chown ghostuser:ghostuser /var/www/ghost
sudo chmod 775 /var/www/ghost
cd /var/www/ghost
Initiate the interactive deployment setup loop:
ghost installInstallation Prompt Matrix
When running ghost install, provide the following inputs:
- Blog URL: Enter your external public URL (e.g.,
https://blog.yourdomain.com). - MySQL hostname:
localhost - MySQL username:
ghost_db_user - MySQL password:
YOUR_SECURE_PASSWORD - Ghost database name:
ghost_prod_db - Set up Nginx?:
No(Skip this; traffic proxy logic is handled externally by NPM). - Set up SSL?:
No(Skip this; SSL validation is terminated at Cloudflare/NPM). - Set up systemd?:
Yes(Generates background runtime process controllers). - Start Ghost?:
No
Note: If the installer reports an Nginx failure warning, ignore it, as we intentionally skipped web server local configuration.
Check config.production.json's server host setting
Open /var/www/ghost/config.production.json and check the "server" block. It should be set like:
...
  "server": {
    "port": 2368,
    "host": "0.0.0.0"
  },
...
Ghost Installation Note: First-Time Boot
- Choose "No" when prompted with "Start Ghost" at the end of
ghost install. - Use
ghost runfor the very first startup. - Avoid
ghost starton the first run.
Why you must use ghost run first:
- Database migrations take a long time during the first boot.
ghost starthas a short timeout limit when checking service status.- The service will auto-stop if the migrations take longer than this timeout.
- A migration lock will happen if the service auto-stops midway.
- You must reset the migration lock manually before you can try again.
Solution:
Running ghost run bypasses the system timeout. This lets the long migrations finish safely without locking up your database.
How to Reset the Migration Lock
If you accidentally used ghost start and triggered a lock, you will see a MigrationsAreLockedError. You must reset the database lock manually.
1. Log into your database
Open your MySQL prompt using your database credentials:
mysql -u ghost_db_user -p
2. Run the reset query
Select your Ghost database and update the lock table:
USE <ghost_prod_db>;

UPDATE migrations_lock SET locked=0 WHERE lock_key='km01';
(Note: If the migrations_lock table is completely empty, insert a clean unlocked record instead):
INSERT INTO migrations_lock (lock_key, locked) VALUES ('km01', 0);
3. Start Ghost correctly
Exit MySQL (exit;) and safely boot Ghost in the foreground to let the migrations finish: [6]
ghost run
Step 6: Network Ingress Configuration
1. Cloudflare DNS & Tunnel Setup
Since you already have a working Cloudflare Tunnel environment active on your network:
- Log into your Cloudflare Dashboard.
- Navigate to Networks ──> Tunnels within your account profile.
- Select your active tunnel architecture and edit the configuration.
- Add a Public Hostname record:
- Subdomain/Domain:
blog.yourdomain.com - Service Type:
HTTP - URL: Input the local static network IP of your Nginx Proxy Manager instance (e.g.,
192.168.1.20:80).
- Subdomain/Domain:
2. Nginx Proxy Manager Setup
- Open your Nginx Proxy Manager Web UI dashboard.
- Select Hosts ──> Proxy Hosts ──> Add Proxy Host.
- Fill out the configuration fields:
- Domain Names:
blog.yourdomain.com - Scheme:
http - Forward Hostname / IP: Enter the Static IP assigned to your Ghost LXC container (e.g.,
192.168.1.50). - Forward Port:
2368 - Block Common Exploits:
Enabled - Websockets Support:
Enabled(Crucial for Ghost administrative panel interactions).
- Domain Names:
- Navigate to the SSL tab:
- Choose an existing wildcard cert or select Request a new SSL Certificate from Let's Encrypt.
- Enable Force SSL to guarantee uniform structural TLS coverage.
- Click Save.
Your setup is complete. You can now access your site securely by navigating to https://blog.yourdomain.com/ghost to finalize administrator profile registration.